Showing posts with label how to. Show all posts

How to Video chat in Blackberry Playbook

By default BlackBerry Playbook has a good video chat software,but it can be used only to chat between blackberry playbook users.Unavailablitity of native Skype and yahoo messenger app for playbook make things worse.Recently i found a a website called http://aol.com/av which can be useful for playbook users to chat with anyone online.its completely web based and no need to download any software.There is no lag in voice and video [If your internet connection is good] .Moreover You don't even need to sign in!

Steps
Login to http://aol.com/av through default playbook browser


Check box for Age Verification
Click on "Start video Chat"
Check Allow and Remember and then close


You will get a link after that.share that link with your friend/partner through Email/SMS/Call.After they clicking link,you can start video call with them.As simple as that 

Pros :
No need of software
No need of Sign Up
Only person with the link can see you
You can Video chat,Voice chat,Take Photos,Send text messages
Chat from anywhere.Even if skype is not installed on your friends computer

How to set up Firefox Sync?

When you set up Firefox Sync on your computer, all of your data and preferences (such as your bookmarks, history, passwords, open tabs and installed add-ons) gets stored securely on the Mozilla servers. Then you can connect other devices (a mobile phone for example) and they will be automatically synchronized, giving you access to all of your information no matter where you are. This article will walk you though setting up Firefox Sync for the first time.


Setting up your Firefox Sync Account

Step 1

In Firefox 4, Click the Firefox menu button at the top-left of the browser.  From the menu Select Options.*


*If the Firefox button does not appear in your browser, Press the Alt+T key-combination to open the tools menu, then Select Options.
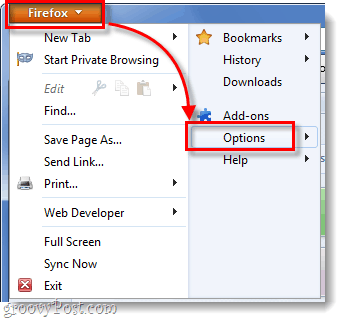
Firefox 4 - Options menu

Step 2

In the options menu, Click the Sync tab and then Click Set Up Firefox Sync.
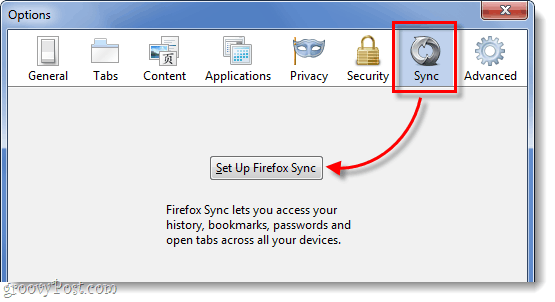
Sync tab on Firefox 4 for set up sync
On the next screen Click the top button that says Create a New Account.
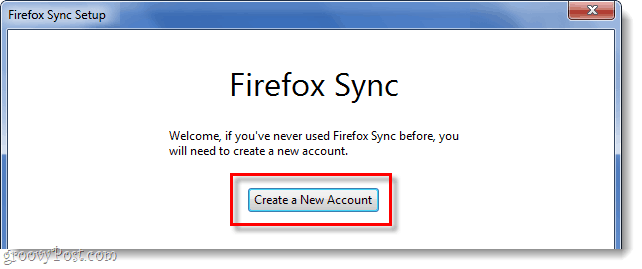
create a new firefox sync account

Step 3

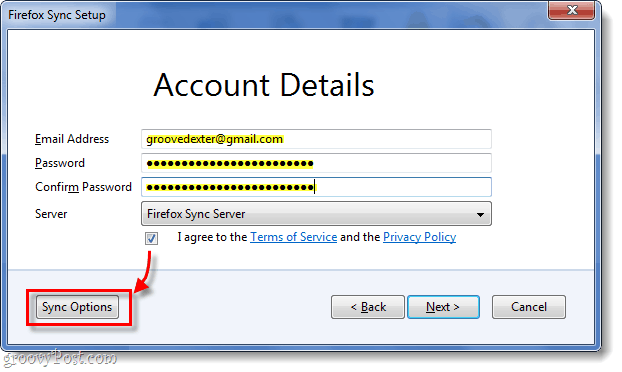
Now you’ll need to fill in a couple different things to create your account.  Enter your email address, and then also enter your password for the sync setup.  Once you’ve filled in the details, Click the Sync Options button.
Tip:  Keep your password something easy to remember. A hacker will need either access to your device or your Sync Key in order to get into your sync account, so a strong password is not necessarily required (but still recommended).
firefox sync account details entry, sync options button

Step 4

From the Sync Options window that appears, Uncheck any items that you don’t want to be synced.  For me I don’t want my online passwords being stored on my phone or other computers, and I don’t need my history synced between devices either.
When done, go back and Click Next on the previous window.
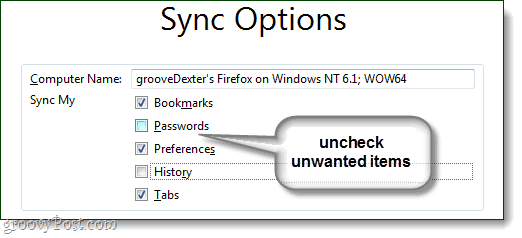

uncheck unwanted sync items

Step 5

Firefox will now give you your newly generated sync key. It is very important that you do not lose this number!  Write it down, print it out, screenshot it and save, do whatever it takes to remember it.  Personally, I just copy mine to a text file and dump it in my Dropbox or email so I can access it anywhere.
If you lose this number and lose access to a synced device, you will not be able to get into your sync account ever again; you also won’t be able to register the same email address to make a new account.  Mozilla (Firefox) does not keep this number on their server, so nobody will be able to recover it for you.
Once you’ve got it backed up, Click Next.
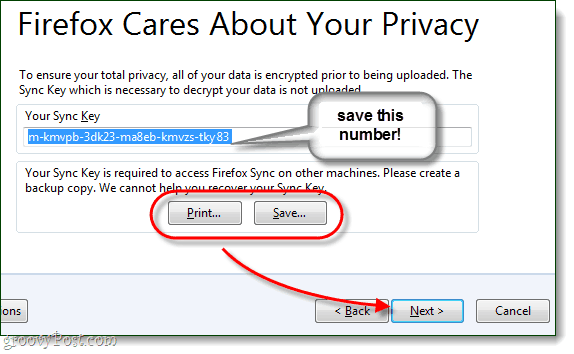
save your firefox sync key, very important

Step 6

Solve the captcha puzzle and Click Next.
solve captcha to complete firefox sync account creation

Done!

Your Firefox sync account is set up and your Firefox 4 client is now synced to the server.  After you Click Finish you’ll be brought to the following page automatically: http://www.mozilla.com/en-US/firefox/sync/firstrun.html
Now you can start adding other devices to your Firefox 4 sync account, and we’ll continue walking through that below. 

firefox sync setup complete window

Connecting Another Computer

Step 1

In Firefox on your additional computer, open up the Options menu.
open firefox 4 options

Step 2

Click the Sync tab in the options menu, then Click Set up Firefox Sync.

firefox 4 sync tab

Step 3

Next Click the bottom button on the Firefox Sync page, titled Connect.
connect to a firefox sync account

Step 4

On the Add a Device page, Click the link on the bottom that says “I don’t have the device with me.”

dont have device with me, add a device to firefox sync

Step 5

Type in your Firefox 4 sync account email address and password.  Then Type in our Sync KeyClick Next when finished.
sign into firefox sync using your email, password, and sync key

Done!

Your Firefox 4 account is now synced on an additional computer.  You can repeat this process as many times as you like.  I have all of my computers running on one Firefox Sync account, and it keeps things groovy.  Being able to easily jump between computers without losing my open browsing tabs is a really useful feature to have.
All that is left now is to add Firefox sync to your phone, below we’ll talk about the process for Android.
  firefox 4 sync setup complete window

Syncing An Android Phone

Step 1

First, you’ll need the Firefox Android app.*  Once the app is installed, Open the Firefox app.
On the outside of your phone Press the menu button and then Tap Preferences on your phone’s screen.
*If you are using Dolphin or some other browser, there are plugins that will do the same thing but to keep tings simple we won’t be talking about those today.
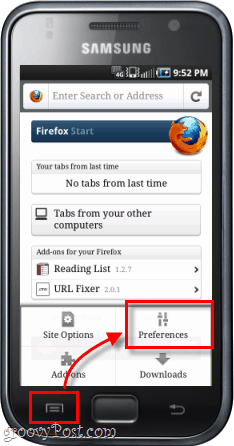
android phone firefox app preferences

Step 2

On the main preferences tab, Click the Connect button.
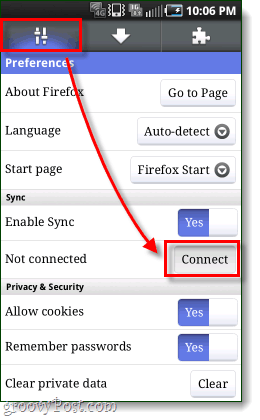
 connect firefox android app to sync

Step 3

Now we have two different options. 
Option 1:  If you have a computer nearby that already has Firefox synced it is the easiest.  The three rows of numbers and letters will need to be typed into a synced computer’s Firefox 4 client, and we’ll go over that below.
Option 2Alternatively if there is no synced computer nearby, you can just Tap I’m not near my computer and then enter in your Account Name (which is actually your email address), Password, and Sync key.
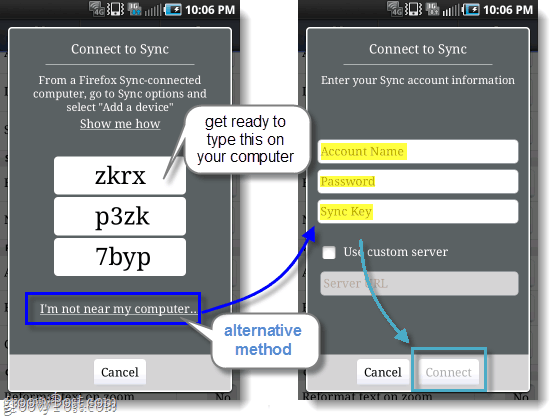
sync password and randomly generated characters

Step 4

Assuming you went with Option 1, now you need to get on your synced computer’s Firefox 4 browser.  Open up the Options window and then on the Synced tab Click Add a Device.
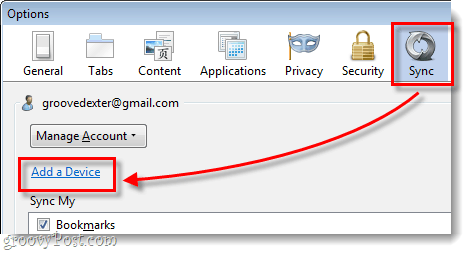
 add a synced device on your computer

Step 5

Type in the 3 rows of letters and numbers just as they appear on your Android phone, then Click Next.
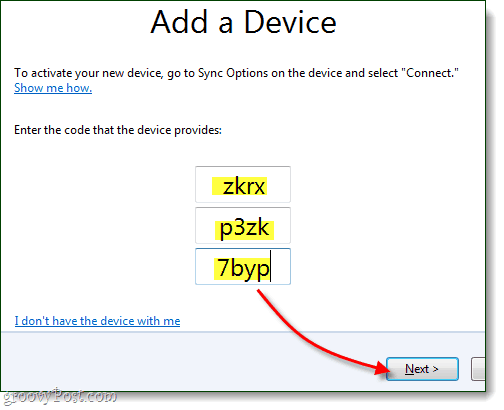
add a device by entering letter-number character password

Done!

Your phone should automatically refresh itself, and it is now synced.  On the preferences page you can now see the account your are synced to, and disconnect (un-sync) option is also available.  Now your tabs and other browser items should be linked to the ones on your computer, and vice versa.
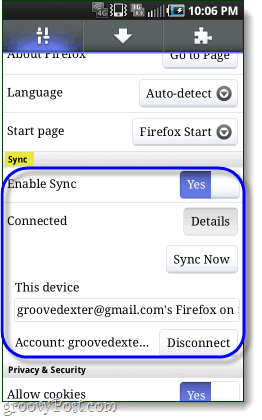
firefox synced to android phone

How to Unsync Firefox 4 On Your Computer

If you want to get rid of Firefox sync, you’ve come to the right spot on this page.  Note that removing Firefox sync will also clear out your preferences and account information on your Firefox 4 client.

Step 1

Open up the Firefox 4 Options window, and then on the Sync tab Click the Deactive this Device link.
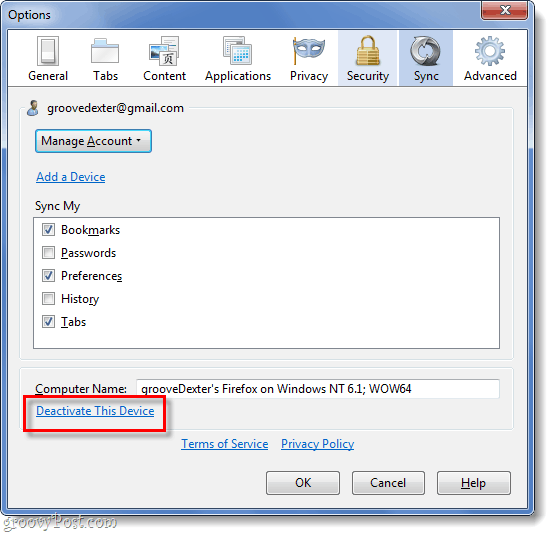
disable firefox 4 sync

Step 2

Click the Reset All Information link to confirm that you want to un-sync.
confirm disable firefox 4 sync

Completely Done!

Via : GroovyPost

How to delete data on your phone before selling it


It's phone upgrading season, and if you are looking to sell your phone on eBay or craigslist or friends or to any shops,Please don't forget to wipe your data before your phone changes hands. Here's a quick guide for anyone who might need it, so you're not fumbling through options and settings for half the day.

iPhone

  • First, you should probably back up your phone using iTunes
  • Go to Settings
  • From there, go to General
  • Now go to Reset
  • Select Erase All Content and Settings
  • You'll be prompted to enter your passcode at this point
  • It will take a few minutes, unless you've got a fairly ancient iOS device

  • Android

  • Backing up for Android is relatively straightforward; just connect your phone to your computer via USB and drag all of your files into a new folder.
  • Pull down your Menu and go to Settings
  • Scroll to Privacy
  • Click Factory data reset

  • Windows Phone 7 and 7.5

  • Back up with Zune software if you're on Windows, but there's currently no way to totally back up your SMS texts for Windows Phone, so keep that in mind if you like to keep hang onto your messages.
  • Go to Settings
  • Tap About
  • Scroll to the bottom of the page and tap "reset your phone"
  • Press "yes" when the warning prompt appears
  • Warning: You won't be asked to confirm your password

  • BlackBerry OS 6

  • Use BlackBerry Desktop Manager to back up your phone
  • Go to Options
  • Scroll to Security
  • Now scroll to Security Wipe
  • Select all options (Email & Contacts, Applications, Media card)
  • Type the word "blackberry" into the box and hit confirm
Via : Gizmodo

HOW TO ENABLE FACEBOOK TIMELINE PROFILE

Facebook has announced two major new features for its social network: Timeline and real-time media sharing. These features will allow you to share “everything” including game activity, music, movies, and things you read online.In Facebook’s annual developers conference F8.Mark Zuckerberg announced this  two new features. 
Timeline, which went into beta today, is designed to let people go back in their lives, Zuckerberg said. It’s how you can tell the whole story of your life on a single page.”
This is a significant change to the way Facebook looks. With Timeline, users will see several new sections, including visual tiles, ways to get all their apps, and a cover photo.
Above is my new profile page.There a large “cover photo” at the top of the page. The idea is that this allows users to jump back to their earliest Facebook posts.You can search your previous posts by year or month.. Click on a year in the timeline, and it scrolls down to that year. Years will also get broken down by month.See the right side of the above picture. In Timeline, users will be able to see everything shared recently. Users can roll their mouse over a point in time, and they instantly get the option to add photos, notes, and other items to that time period..Simply you can arrange your photos and details in the same year that it really happened.You can upload your photos in college days in the same month and year it was taken
If you are impatient and want to experience the new Timeline Facebook announced earlier today, you can turn it through the developer section of Facebook. The process is simple, takes a few minutes, and will require some patience as Facebook tidies up any lingering issues and bugs. Here goes:
1. Log into Facebook
2. Enable developer mode, if you haven’t already. To do this, type “developer” into the Facebook search box, click the first result (it should be an app made by Facebook with a few hundred thousand users), and add the app.
3. Jump into the developer app (if Facebook doesn’t put you there automatically, it should be in your left-hand tool bar)
4. Create a new app and give any display name and namespace . Read through and agree to the Platform Privacy agreement. This is the step you need to be verified for.
5. Ensure you’re in your new app’s main settings screen. You should see your app’s name near the top of the page

6. Look for the “Open Graph” header, and click the “Get Started using open graph” link. Create a test action for your app.
7. This should drop you into an action type configuration page. Change a few of the default settings, and click through all three pages of settings
8. Wait 2-3 minutes
9. Go back to your Facebook homescreen. An invite to try Timeline should be waiting at the top of the page.
That’s it. Once you click on Get It Now, you will then be redirected to your new Timeline. Your Timeline is private, by default, for the time being.
A few things to note:
- Only you will see your timeline at first (unless you decide otherwise), but it will automatically go public after a few days. 
- It seems that if you login into Facebook on another machine, Timeline gets disabled automatically on all of your machines. With that said, it seems you can get back to your timeline (but ONLY after following the steps below) by navigating to http://www.facebook.com/YOURUSERNAMEHERE?sk=timeline
- You’ll need to have a “verified” account for one of the steps, which means you need a credit card or phone number attached to the account.
Try it yourself....

How to close All programs in One Click


While browsing I came across a very useful program.This program lets you close all running applications in Windows XP/Windows 7 with just a single click. It doesn't use system resources because it only flashes a ‘close’ signal to all open applications on the desktop and then ceases. Just create a shortcut to the tool in the Start Menu, Quick Launch or elsewhere.

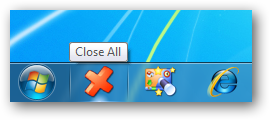
Close All on Windows XP Quick Launch
You can always add a hotkey to this shortcut. It is really very handy if you are running ~20 applications and want them all to quit instantly. It works just as if you were pressing the close button for each application.
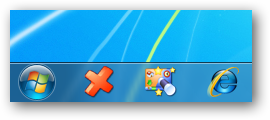
Close All - Windows 7 Taskbar
Close All on Windows 7 Taskbar/Superbar
How To Install
Close All Windows is a very simple utility that doesn’t require installation. No settings are stored in the Windows Registry or file system. Just follow the steps below to set it up on your computer. 

Download the ZIP archive and extract it to desktop

Open the extracted folder, right-click CloseAll.exe and choose Send To -> Desktop (create shortcut) from the context menu.

Switch to the Desktop and rename the created shortcut to “Close All” or whatever you want.

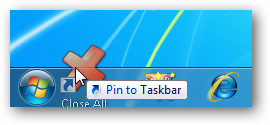
Now you can drag this shortcut to the Quick Launch Bar or to the Windows 7 Taskbar for quick access.
      Close All - Pin to TaskbarClose All - Pin to Taskbar

    Try it Now!! For more details visit : Homepage

How to make VOIP calls without Computer


Answer is NetTalk Duo

Free calls to US and Canada . No computer required . No monthly Phone bills


We know about  MagicJack and Vonage and Google Voice, services that allow us to  make phone calls over the Internet.The netTalk is a device introduced by Duo, which can be  connected directly to your computer or directly to your Internet connection, so you don't have to rely on a computer for phone service.

Connect the DUO directly to your router.

There is no need to leave your computer running to make or receive calls!
The netTALK DUO is designed to connect directly to your router or modem, resulting in cost and energy savings while minimizing wear and tear on your computer.

Duo to Router

Or

Connect the DUO directly to your computer.

Take your phone number with you anywhere in the world!
Plug the DUO directly into your computer to make and receive calls. To use the DUO without a traditional telephone, Download official Videophone application for face-to-face communication anywhere there is Internet access.

Duo to Computer

The netTalk service, which is available through the netTalk Web site, includes caller ID, three-way calling, call forwarding, call waiting, enhanced 911, voicemail, 411 directory assistance, and one feature MagicJack doesn’t—live technical support.

For more details,features and pricing : NetTalk

How to Speed up your PC

Want a simple way to speed up your PC?
ReadyBoost is a service in windows that can speed up your computer by using storage space on most USB flash drives and flash memory cards. When you plug a ReadyBoost-compatible storage device into your computer, the AutoPlay dialog box gives you the option to use ReadyBoost. If you select this option, you can choose how much memory on the device to use for this purpose.

How to Use

  1. Plug a flash drive or flash memory card into your computer.
  2. In the Autoplay dialog box, under General options, click Speed up my system.


  3. In the Properties dialog box, click the ReadyBoost tab, and then do one of the following:
    • To turn ReadyBoost off, click Do not use this device.
    • To use the maximum available space on the flash drive or memory card for ReadyBoost, click Dedicate this device to ReadyBoostWindows will leave any files already stored on the device, but it'll use the rest to boost your system speed.
      Picture of the ReadyBoost tab
    • To use less than the maximum available space on the device for ReadyBoost, click Use this device, and then move the slider to choose the amount of available space on the device you want to use.
  4 .Once you click OK, ReadyBoost will configure the device to use the cache and immediately begin using it

In order to ensure the safety, integrity, and efficiency of the ReadyBoost system, Microsoft has added several safeguards.


To begin with, the data on device is automatically encrypted using the Advanced Encryption Standard — AES 128. Therefore, if you happen to lose the device, you won’t have to worry about someone getting access to data.


While the operating system will actually work from the cache on the device, all the data in the cache is mirrored on the hard disk. Therefore, if you inadvertently remove the device while it’s in use by ReadyBoost, the operating system will immediately fall back to the cache on the hard disk and pick up right where it left off.


Video Tutorial


How to create Password Reset Disc : Win 7


In the old days, we can create a password-reset disk to use in case  we forgot  Windows administrator password. But can we do this on a Windows 7 computer with no floppy drive? Yes!
Windows 7 does allow you to make a password-reset disk in advance in case you ever forget your administrator password and do not have it written down. You can now use a portable USB drive instead of a floppy disk.

To get started, you need a spare USB flash drive. Once you have the drive, plug it into a USB port on the computer. Next, go to the Start menu  > Control Panel. Click “User Accounts”. (You can also get there by typing “user” in the search box on the Start menu and selecting User Accounts from the list of results.)

In the pane on the left side of the User Accounts box, click the link for “Create a password reset disk.” When the Forgotten Password Wizard appears, follow the steps to select your USB drive as the place you want to store your information and type in your current password.

Once you have completed the steps, eject the USB drive and store it in safe place. If you do need the drive later to reset your password after a failed attempt at the Windows login box, click O.K. on the “User name and password are incorrect” screen. Then plug in the drive and click the Reset Password option on the next screen to open the Password Reset Wizard.

Subscribe to Newsletter

Enter your email address:

Total Pageviews

 
Additive Tricks © 2011 | Designed by Shabeer Ibm